

How to Install a WordPress Theme
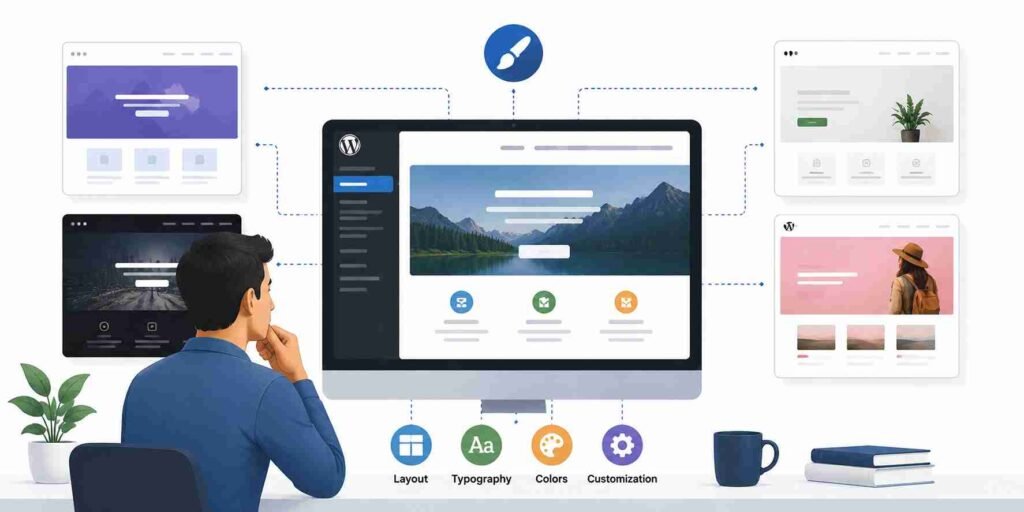
Your WordPress theme determines how your website looks and feels. It controls the layout, typography, colors, navigation, and many design elements that visitors interact with when they browse your site.
Whether you’re creating a personal blog, business website, online portfolio, or eCommerce store, choosing and installing the right theme is one of the first and most important steps after setting up WordPress.
Fortunately, installing a WordPress theme is straightforward. WordPress offers multiple installation methods, including installing free themes from the official directory, uploading premium themes, and manually installing themes via FTP for advanced users.
In this guide, you’ll learn every popular method to install a WordPress theme, understand the difference between free and premium themes, learn how to switch themes safely, and discover best practices for choosing a fast, secure, and well-maintained theme.
Note: The appearance of the WordPress dashboard may vary slightly depending on your WordPress version, active theme, installed plugins, and whether you’re using a classic theme or a block theme.
What Is a WordPress Theme?
A WordPress theme is a collection of files that controls your website’s visual appearance and, in many cases, aspects of its layout and presentation. Themes define how your content is displayed without changing the underlying content itself.
A theme typically controls:
- Website layout
- Header and footer design
- Navigation menus
- Fonts and typography
- Color schemes
- Blog layouts
- Sidebar placement
- Page templates
- Archive layouts
- Mobile responsiveness
Think of your WordPress website as a house. Your content, such as pages, posts, and images, is the furniture inside the house. The theme is the architectural design that determines how everything is presented to visitors.
Changing the theme changes the appearance of your website, but it generally does not delete your pages, blog posts, media files, or user accounts.
Theme vs Plugin: What’s the Difference?
Many beginners confuse themes with plugins because both can be installed from the WordPress dashboard. However, they serve different purposes.
| Feature | Theme | Plugin |
|---|---|---|
| Purpose | Controls design and layout | Adds features and functionality |
| Example | Astra, Blocksy, Kadence | Contact Form 7, WooCommerce, Rank Math |
| Controls colors | ✔ | ✘ |
| Controls page layouts | ✔ | ✘ (usually) |
| Adds contact forms | ✘ | ✔ |
| Adds SEO features | ✘ | ✔ |
| Adds eCommerce functionality | ✘ | ✔ |
A simple way to remember the difference is:
- Themes control how your website looks.
- Plugins control what your website can do.
For example, installing WooCommerce adds online store functionality, while installing Astra changes how your store looks.
Can You Change Your Theme Later?
Yes. One of the biggest advantages of WordPress is that you can switch themes whenever you want.
When you activate a different theme:
- Your posts remain intact.
- Your pages remain intact.
- Your media library is preserved.
- Your users and comments stay the same.
- Your database content is not deleted.
However, some design elements may change depending on how your previous theme handled them.
For example, after switching themes, you may need to:
- Reassign menus
- Configure widgets
- Adjust homepage settings
- Upload your logo again
- Customize colors and typography
- Recreate certain layouts if they relied on theme-specific features
If your previous theme included proprietary page builders or shortcodes, some layouts may require additional adjustments after switching.
Before Installing a WordPress Theme
Installing a theme only takes a few minutes, but spending a little time preparing can help you avoid problems later.
1. Update WordPress
Before installing a new theme, make sure your WordPress installation is up to date.
Running the latest version helps improve:
- Security
- Performance
- Compatibility
- Stability
You can check for updates by navigating to:
Dashboard → Updates
Install any available updates before changing your website’s appearance.
2. Create a Website Backup
Even though changing a theme is generally safe, creating a backup is always a good practice.
A backup allows you to restore your website if something unexpected happens during the process.
Many hosting providers offer automatic backups, and numerous backup plugins are also available.
If you’re making significant design changes on an established website, consider testing them on a staging site first.
3. Check PHP Compatibility
Modern WordPress themes often require relatively recent versions of PHP.
Using an outdated PHP version may cause:
- Installation errors
- Performance issues
- Missing features
- Security vulnerabilities
You can usually find your PHP version in your hosting control panel or through your hosting provider’s dashboard.
If you’re unsure whether your server meets the theme’s requirements, consult your hosting provider or the theme documentation.
4. Choose a Responsive Theme
A responsive theme automatically adjusts its layout to fit different screen sizes.
Today, a large percentage of visitors browse websites on smartphones and tablets.
Before installing a theme, preview it on different devices if possible.
Look for layouts that adapt gracefully to:
- Desktop
- Laptop
- Tablet
- Mobile phone
A responsive design improves usability and contributes to a better overall user experience.
5. Check Theme Ratings and Reviews
If you’re installing a theme from the WordPress.org directory, review:
- Average rating
- Number of active installations
- Recent reviews
- Last updated date
- Support activity
A theme with many active installations and regular updates often indicates that it is actively maintained.
No theme is perfect, so read reviews thoughtfully rather than relying on the star rating alone.
6. Verify Regular Updates
WordPress evolves continuously.
A theme that hasn’t been updated for several years may eventually become incompatible with newer versions of WordPress or PHP.
Before installing a theme, check when it was last updated.
Themes that receive regular maintenance are generally a safer long-term choice.
7. Consider Performance
A visually impressive theme isn’t always the best option.
Some themes include excessive animations, scripts, or bundled features that can slow down your website.
When choosing a theme, balance appearance with performance.
A lightweight, well-coded theme often provides a better foundation than one overloaded with features you may never use.
8. Think About Future Needs
Consider what your website may need as it grows.
For example:
- Will you add an online store?
- Do you need multilingual support?
- Will you publish a blog?
- Do you plan to use a page builder?
- Will multiple authors contribute content?
Choosing a theme that supports your future goals can save time later.
Where Can You Find WordPress Themes?
Thousands of WordPress themes are available online. However, not every website offering themes is trustworthy.
Below are the most common sources.
1. Official WordPress Theme Directory
The safest place to start is the official WordPress theme directory.
Themes available here undergo a review process before being listed.
Benefits include:
- Free to use
- Easy installation
- Regular updates
- Compatibility with current WordPress versions
- Community support
Most beginners should begin with themes from the official directory.
2. Premium Theme Providers
Premium themes typically offer:
- Advanced customization
- Dedicated customer support
- Additional templates
- Premium starter sites
- Frequent feature updates
Many reputable companies develop premium WordPress themes designed for different types of websites.
When purchasing a premium theme, always buy directly from the developer or an authorized marketplace.
3. Theme Marketplaces
Online marketplaces provide access to themes from multiple developers.
They often include:
- Business themes
- Portfolio themes
- Magazine themes
- WooCommerce themes
- Landing page themes
Before purchasing, review:
- Update history
- Customer ratings
- Documentation
- Support policies
Choose themes with an active development history rather than those that have been abandoned.
Avoid Downloading Nulled Themes
You may come across websites offering paid themes for free.
These are commonly referred to as nulled themes.
Although they may appear attractive, they often come with serious risks, including:
- Hidden malware
- Backdoors
- Spam code
- Security vulnerabilities
- No official updates
- No developer support
- Potential licensing violations
Using nulled themes can compromise your website’s security and reliability.
For long-term projects, always obtain themes from legitimate sources.
Popular Beginner-Friendly WordPress Themes
If you’re not sure where to start, these themes are well-known for their ease of use and regular maintenance.
Astra
Astra is a lightweight and highly customizable theme suitable for blogs, business websites, portfolios, and online stores.
Kadence
Kadence WordPress theme offers modern design options, an intuitive header builder, and strong performance.
Blocksy
Blocksy is a feature-rich theme that balances flexibility with speed and works well for many types of websites.
GeneratePress
GeneratePress Known for its clean code and excellent performance, making it a popular choice for bloggers and developers alike.
Twenty Twenty-Six (or the current default WordPress theme)
Ideal for learning the latest WordPress features, especially Full Site Editing if you’re using a block theme.
The best theme depends on your goals, budget, and preferred workflow rather than simply choosing the one with the most features.
How to Install a WordPress Theme
In this section, you’ll learn the three most common methods for installing a WordPress theme. Most beginners only need the first method, but understanding all three will help you troubleshoot installation issues and work with premium themes in the future.
Method 1: Install a Theme from the WordPress Dashboard (Recommended)
This is the easiest and safest method for installing free themes from the official WordPress Theme Directory.
If you’re installing your very first theme, this should be your preferred approach.
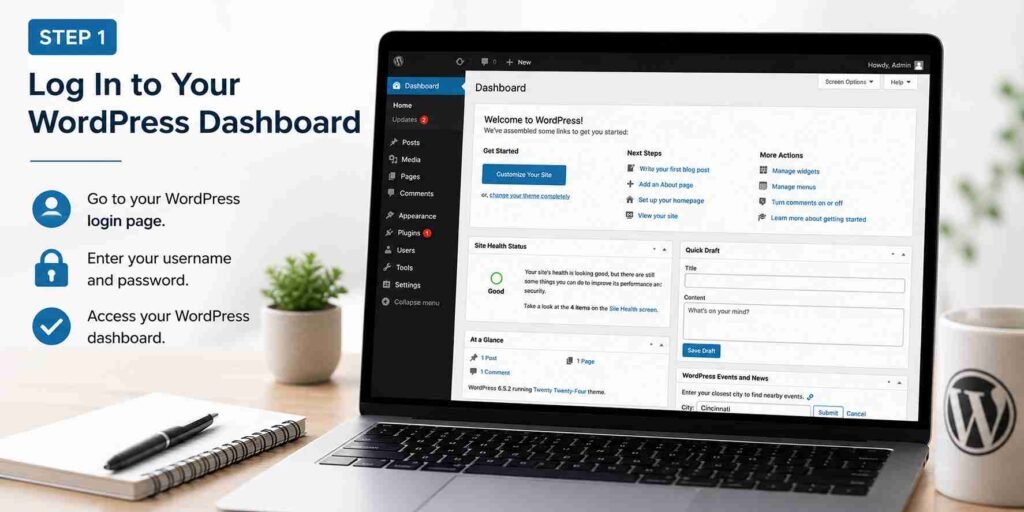
Step 1: Log In to Your WordPress Dashboard
- Open your WordPress login page and sign in using your administrator account.
- Once logged in, you’ll arrive at the WordPress Dashboard.
Step 2: Navigate to Themes
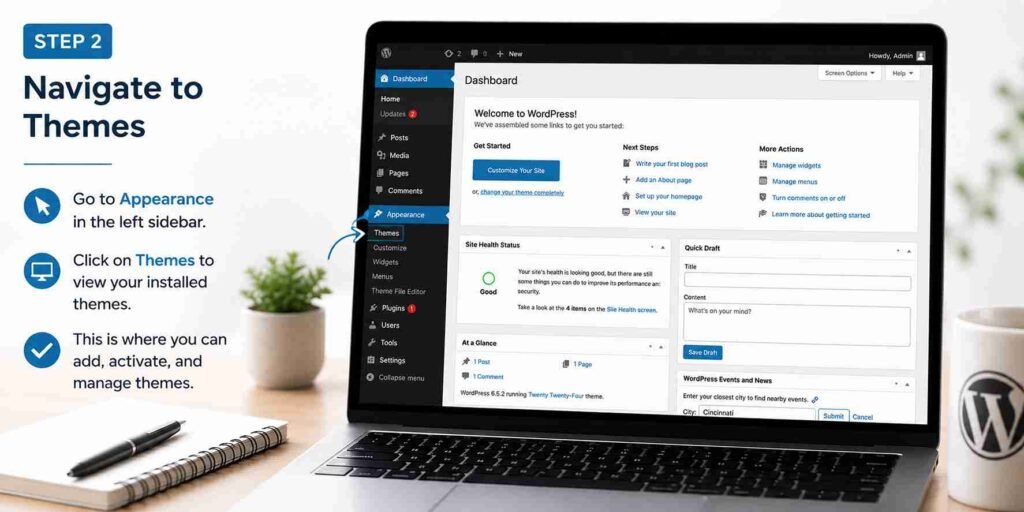
From the left sidebar, go to:
Appearance → Themes
- This page displays all themes currently installed on your website.
- Typically, you’ll see the active theme along with one or more default WordPress themes.
Step 3: Click “Add New Theme”
At the top of the page, click the Add New Theme button.
WordPress opens the official Theme Directory, where you can browse thousands of free themes without leaving your dashboard.
Step 4: Search for a Theme
Use the search box in the top-right corner.
For example, search for:
- Astra
- Kadence
- Blocksy
- GeneratePress
- Twenty Twenty-Six (or the latest default theme)
WordPress instantly filters matching themes.
Step 5: Preview the Theme
Before installing a theme, click Preview.
The preview gives you an idea of:
- Homepage layout
- Typography
- Navigation style
- Colors
- Widget areas
Keep in mind that the preview uses sample content and your actual website may look different after activation.
Some themes also provide live demo websites where you can explore additional layouts and features.
Step 6: Install the Theme
Click the Install button.
WordPress downloads the theme and installs it automatically.
This usually takes only a few seconds.
Step 7: Activate the Theme
Once installation is complete, the Install button changes to Activate.
Click Activate.
Your website is now using the new theme.
Visit the front end of your website in another browser tab to see the changes.
What Happens After Activating a Theme?
After activation, your website adopts the new theme’s design.
Depending on the theme, you may notice:
- A different homepage layout
- New fonts
- Updated navigation
- New widget areas
- Different color scheme
- Additional customization options
Some premium and multipurpose themes display a setup wizard after activation to help you install recommended plugins or import starter templates.
Method 2: Upload a Theme ZIP File
This method is commonly used for premium themes purchased from developers or marketplaces.
Instead of installing from the WordPress Theme Directory, you’ll upload the ZIP file provided by the theme developer.
Important: Upload the original ZIP file supplied by the developer. If you extract it first, WordPress won’t be able to install it through the upload interface.
When Should You Use This Method?
This method is recommended when:
- You purchased a premium WordPress theme.
- You downloaded a custom theme from a developer.
- You received a theme from a client or agency.
- You created your own custom theme.
- The theme is not available in the WordPress Theme Directory.
Some popular premium themes include:
- Astra Pro
- Kadence Pro
- GeneratePress Premium
- Divi
- Avada
- Flatsome
- WoodMart
Although every theme has its own features, the installation process is almost identical.
Step 1: Download the Theme ZIP File
After purchasing a premium theme, download the installation package from the developer’s website.
Most developers provide a downloadable ZIP file.
For example:
astra.zipor
kadence.zipImportant
Do not extract the ZIP file before uploading it to WordPress.
Many beginners unzip the theme on their computer and then try to upload the extracted folder. WordPress expects the original ZIP archive during installation.
If you extract the ZIP file, WordPress may display errors such as:
- The package could not be installed.
- Missing stylesheet.
- Invalid theme package.
Always upload the original installable ZIP file unless the theme documentation specifically instructs otherwise.
Step 2: Open the Themes Screen
Log in to your WordPress Dashboard.
Navigate to:
Appearance → Themes
Click the Add New Theme button located near the top of the page.
Instead of searching the Theme Directory, click:
Upload Theme
(Insert Screenshot: Upload Theme Button)
Step 3: Select the Theme ZIP File
Click Choose File.
Browse to the ZIP file you downloaded.
Select the file.
For example:
astra.zipClick:
Install Now
WordPress will upload the ZIP file to your website.
Depending on your internet connection and hosting performance, the upload usually takes only a few seconds.
Step 4: Install the Theme
WordPress will now:
- Upload the archive
- Extract the files
- Copy them into the Themes directory
- Verify the installation
If everything is successful, you’ll see a message similar to:
Theme installed successfully.
You will also see an Activate button.
(Insert Screenshot: Theme Installed Successfully)
Step 5: Activate the Theme
Click Activate.
Your new theme immediately becomes the active design of your website.
Visit your homepage to verify that the new theme is working correctly.
Remember that a newly activated theme often looks different from the beautiful demo shown on the developer’s website.
This is completely normal.
Demo websites usually contain:
- Sample pages
- Custom menus
- Demo images
- Widgets
- Theme settings
- Premium plugins
Your fresh WordPress installation contains none of these, so your website initially appears much simpler.
Common Mistake: Uploading the Wrong ZIP File
One of the most common theme installation problems occurs because users upload the wrong ZIP file.
Many premium themes are distributed inside a larger package.
For example:
theme-download.zipAfter extracting it, you may find:
Documentation/

Licenses/

Child Theme/

Demo Content/

Main Theme.zip
The file you should upload is usually:
Main Theme.zip—not the entire download package.
If WordPress displays the error:
The package could not be installed. The theme is missing the style.css stylesheet.
you’re almost certainly uploading the wrong ZIP file.
Always read the developer’s installation instructions before uploading.
Method 3: Install a WordPress Theme Using FTP
Installing a theme using FTP (File Transfer Protocol) is an advanced method that gives you direct access to your website’s files.
Most beginners will never need to use FTP because the WordPress dashboard installation methods are much easier.
However, FTP can be useful when:
- The dashboard uploader fails.
- Your hosting upload limit is too small.
- You cannot access the WordPress admin.
- You’re installing a large custom theme.
- You’re troubleshooting theme installation issues.
What Is FTP?
FTP is a method of transferring files between your computer and your web server.
Instead of uploading files through WordPress, you upload them directly into your website’s folders.
Common FTP applications include:
- FileZilla
- Cyberduck
- WinSCP
Many hosting providers also offer a built-in File Manager, which can perform similar tasks without installing FTP software.
Step 1: Download and Extract the Theme
Download the theme ZIP file.
Extract it on your computer.
You should now have a folder similar to:
astra/Inside that folder you’ll see files such as:
style.css

functions.php

index.php

screenshot.png
Step 2: Connect to Your Website
Open your FTP client.
Connect using your hosting credentials.
You’ll typically need:
- Hostname
- Username
- Password
- Port
If you’re unsure about these details, check your hosting provider’s documentation.
Step 3: Locate the Themes Folder
Navigate to:
wp-content/

↓

themes/
This folder contains every installed theme.
For example:
themes/

├── twentytwentysix

├── twentytwentyfive

├── astra
Step 4: Upload the Theme Folder
Upload the extracted theme folder directly into:
wp-content/themes/Do not upload the ZIP file here.
Upload the extracted folder.
Once the upload completes, the folder structure should resemble:
wp-content/

└── themes/

     └── astra/

          style.css

          functions.php

          screenshot.png
Step 5: Activate the Theme
Return to the WordPress Dashboard.
Navigate to:
Appearance → Themes
WordPress automatically detects the uploaded theme.
Click:
Activate
Your website will now begin using the new theme.
Which Installation Method Should You Use?
Although WordPress offers three installation methods, each serves a different purpose.
| Method | Recommended For |
|---|---|
| Theme Directory | Free themes |
| ZIP Upload | Premium themes |
| FTP | Advanced users and troubleshooting |
For most beginners, the first two methods are all you’ll ever need.
How to Activate a WordPress Theme
Installing a theme and activating a theme are two separate actions.
A theme may be installed on your website without being active.
To activate a theme:
- Go to Appearance → Themes
- Locate the installed theme.
- Click Activate
The active theme will display an Active label.
Only one theme can be active at a time.
However, WordPress allows you to keep multiple themes installed.
This can be useful if you occasionally switch themes for testing or development.
How to Change Your WordPress Theme Safely
Changing themes is simple, but doing it carelessly can affect your website’s appearance.
Fortunately, changing themes does not delete your content.
Your posts, pages, images, users, and settings remain in your database.
However, certain design elements may change.
Before switching themes, follow these best practices.
1. Create a Backup
Always create a full website backup before changing themes on a live website.
If something unexpected happens, you can quickly restore the previous version.
2. Test on a Staging Website
Many hosting providers include staging environments.
A staging website is a private copy of your live website.
It allows you to:
- Test themes
- Install plugins
- Update WordPress
- Experiment safely
without affecting your visitors.
If your hosting provider offers staging, use it whenever possible.
3. Review Theme Compatibility
Before activating a new theme, verify that it supports:
- Your WordPress version
- PHP version
- Required plugins
- WooCommerce (if applicable)
- Gutenberg Block Editor
- Mobile responsiveness
Installing an outdated theme on a modern WordPress website can lead to unexpected layout issues or functionality problems.
4. Check Your Menus
After activating a new theme, visit:
Appearance → Menus
Some themes use different menu locations.
For example:
Old Theme:
Primary NavigationNew Theme:
Header MenuYou may simply need to assign your existing menu to the new location.
5. Verify Widgets
Classic themes often use widget areas differently.
Check:
- Sidebar
- Footer
- Header widgets
Some widgets may become inactive after changing themes.
Fortunately, WordPress usually stores them under Inactive Widgets, allowing you to restore them if needed.
6. Review Your Homepage
Many premium themes include custom homepage layouts.
After activating a different theme:
- Check your homepage.
- Verify images.
- Test buttons.
- Review spacing.
- Confirm typography.
- Inspect responsive design.
A quick visual inspection helps you catch layout issues before visitors do.
7. Test Your Website
Before considering the job complete, test:
- Homepage
- Blog
- Contact page
- Navigation menus
- Forms
- Search
- Mobile version
- Tablet version
- Desktop version
Look for:
- Missing images
- Broken layouts
- Incorrect fonts
- JavaScript errors
- Slow loading
Changing themes affects presentation, so a short testing session is well worth the time.
What Happens When You Change a WordPress Theme?
One of the most common questions beginners ask is:
Will changing my WordPress theme delete my website?
The short answer is no.
Changing your theme affects how your website looks, but it does not remove your content. WordPress stores your posts, pages, users, media files, and most settings separately from the theme itself.
However, some visual and functional elements may change depending on how the old and new themes are built.
Understanding what changes and what stays the same will help you switch themes with confidence.
What Does Not Change
Your website content remains intact after changing themes.
This includes:
- Posts
- Pages
- Categories
- Tags
- Media Library
- Comments
- Users
- Passwords
- Basic WordPress settings
- Installed plugins
- Database content
For example, if you’ve written 200 blog posts using one theme, they will still be available after activating another theme.
Think of your theme as the clothing your website wears. Changing clothes alters the appearance, not the person wearing them.
What May Change
Although your content remains safe, some design-related elements may look different after switching themes.
These can include:
Layout
The new theme may use:
- Full-width pages
- Sidebars
- Different content widths
- Different typography
- Different spacing
As a result, your website may immediately look different after activation.
Menus
Most themes have predefined menu locations.
For example:
Old Theme
Primary Menu
Footer Menu
New Theme
Header Navigation
Mobile Menu
Footer Navigation
Your existing menu usually isn’t deleted, but you may need to assign it to the new theme’s menu location.
You can do this by navigating to:
Appearance → Menus
or, for block themes,
Appearance → Editor → Navigation
Widgets
Classic themes often use widget areas.
Examples include:
- Sidebar
- Footer
- Header
If your new theme has different widget locations, WordPress may move unused widgets to the Inactive Widgets area.
Nothing is permanently lost, but you may need to reposition them.
Theme Customization
Every theme includes its own customization options.
These might include:
- Typography
- Header layout
- Footer layout
- Colors
- Blog layout
- Archive pages
These settings belong to the theme itself.
When you activate another theme, those settings generally do not transfer automatically.
Homepage Layout
Many premium themes include custom homepage templates.
After changing themes, your homepage may:
- Look different
- Lose custom styling
- Require new templates
- Need widgets reassigned
Always review your homepage after switching themes.
Shortcodes
Older themes sometimes include proprietary shortcodes.
Example:
[button]If those shortcodes belong to the previous theme, they may stop working after switching themes.
Modern WordPress websites should avoid relying heavily on theme-specific shortcodes whenever possible.
Page Builders
If your website uses Elementor, Beaver Builder, Divi Builder, or another page builder, changing themes usually does not delete your pages.
However, layouts may require adjustments if the new theme handles widths, spacing, or typography differently.
Always preview important pages after changing themes.
Classic Themes vs Block Themes
One of the biggest changes in recent versions of WordPress is the introduction of Block Themes.
Understanding the difference helps you choose the right theme for your needs.
What Is a Classic Theme?
Classic themes have been part of WordPress for many years.
They primarily use:
- Theme Customizer
- Widgets
- Menus
- PHP templates
Customization usually happens through:
Appearance → Customize
Classic themes are familiar to many long-time WordPress users.
Examples include:
- Astra
- GeneratePress
- OceanWP
- Neve
What Is a Block Theme?
Block themes are built around the Full Site Editing (FSE) system.
Instead of using the Theme Customizer, they use the Site Editor.
Navigate to:
Appearance → Editor
From there, you can customize:
- Headers
- Footers
- Templates
- Navigation
- Styles
- Patterns
- Template Parts
All using Gutenberg blocks.
Which One Should You Choose?
There isn’t a single “best” answer.
Choose a Classic Theme if:
- You’re already familiar with the Customizer.
- You use traditional widgets.
- Your favorite theme hasn’t transitioned to block editing.
- You rely on page builders like Elementor.
Choose a Block Theme if:
- You’re starting a new website.
- You want full visual editing.
- You prefer using Gutenberg.
- You want greater layout flexibility.
WordPress is investing heavily in block-based editing, so becoming familiar with block themes can be beneficial for future projects.
Classic Themes vs Block Themes
| Feature | Classic Theme | Block Theme |
|---|---|---|
| Customizer | Yes | No |
| Site Editor | No | Yes |
| Widgets | Yes | Block Areas |
| Navigation | Menus | Navigation Block |
| Templates | PHP | HTML + Blocks |
| Future Direction | Supported | Recommended for modern WordPress |
Free vs Premium Themes
Another common question is whether free themes are good enough.
The answer depends on your website’s requirements.
Free Themes
Free themes available through the official WordPress Theme Directory undergo a review process before being listed.
Advantages include:
- Free to use
- Easy installation
- Community support
- Regular updates (for active projects)
- Beginner friendly
Limitations may include:
- Fewer customization options
- Limited support
- Fewer starter templates
- Advanced features locked behind premium versions
Premium Themes
Premium themes are purchased directly from developers or marketplaces.
Advantages include:
- More templates
- Better customization
- Premium support
- Additional layouts
- Dedicated documentation
- Regular feature updates
Potential disadvantages include:
- Purchase cost
- Renewal fees
- Learning curve
- Feature overload in some themes
Which Should Beginners Choose?
If you’re learning WordPress, a well-maintained free theme is usually enough.
You can always upgrade later if your website requires more advanced functionality.
Remember:
A premium theme won’t automatically make your website better.
Good content, performance, and usability matter much more than expensive design features.
How to Update a WordPress Theme
Keeping your theme updated is an important part of website maintenance.
Theme updates often include:
- Security patches
- Bug fixes
- Performance improvements
- Compatibility updates
- New features
Ignoring updates for long periods may expose your website to security risks or compatibility problems.
Method 1: Update from Dashboard
Navigate to:
Dashboard → Updates
If a theme update is available, WordPress will display it.
Select the theme.
Click:
Update Themes
WordPress downloads and installs the update automatically.
Method 2: Update from Themes Screen
Go to:
Appearance → Themes
Themes with available updates usually display a notification.
Click:
Update Now
Wait for the update to finish.
Should You Update Immediately?
For a personal blog, updating promptly is generally a good idea.
For business websites or eCommerce stores, consider the following workflow:
- Create a backup.
- Test updates on a staging site.
- Update plugins.
- Update the theme.
- Test the website.
- Push changes to production.
This approach minimizes unexpected downtime.
What Is a Child Theme?
If you plan to edit theme files, you should understand child themes.
A child theme is a separate theme that inherits the functionality and styling of another theme, known as the parent theme.
Instead of editing the parent theme directly, you make your changes in the child theme.
This provides an important advantage:
When the parent theme receives an update, your customizations remain intact.
Editing a parent theme directly can cause all custom changes to be overwritten during updates.
We’ll cover child themes in detail in a dedicated tutorial.
How to Delete a WordPress Theme
Unused themes can remain installed on your website, but keeping unnecessary themes indefinitely isn’t considered good maintenance practice.
Step 1
Go to:
Appearance → Themes
Step 2
Select the inactive theme you want to remove.
Remember:
You cannot delete the active theme.
If you want to delete it, first activate another theme.
Step 3
Click:
Theme Details
Step 4
Click:
Delete
Confirm the deletion.
WordPress removes the theme from your website.
Should You Delete Unused Themes?
Keeping one default WordPress theme as a backup is often considered a sensible practice.
For example:
- Twenty Twenty-Six
- Twenty Twenty-Five
These themes can be useful for troubleshooting.
However, dozens of unused themes provide little benefit and increase maintenance overhead.
Keep your installation clean and organized.
Best Practices for Installing WordPress Themes
Following a few best practices can help you avoid many common problems.
Download Themes from Trusted Sources
Always install themes from:
- The official WordPress Theme Directory
- Reputable commercial developers
- Trusted marketplaces
Avoid downloading “free premium themes” from unofficial websites.
These often contain hidden malware, spam links, or malicious code.
Install Only the Themes You Need
Installing dozens of themes “just in case” serves little purpose.
Keep only:
- Your active theme
- One default backup theme
- A child theme (if applicable)
Keep Themes Updated
Regular updates improve:
- Security
- Performance
- Compatibility
Set a reminder to review updates regularly.
Test Before Switching
Especially for live websites:
- Create backups
- Use staging
- Test layouts
- Check forms
- Review mobile responsiveness
A few minutes of testing can prevent hours of troubleshooting later.
Avoid Editing Theme Files Directly
If you need to customize a theme:
- Use the Customizer or Site Editor when possible.
- Use a child theme for code changes.
- Avoid editing the parent theme’s PHP files directly.
This makes future updates much easier.
Remove Nulled Themes
Nulled themes may appear attractive because they’re free versions of premium products.
However, they frequently contain:
- Malware
- Hidden advertisements
- SEO spam
- Backdoors
- Malicious scripts
The potential security risk far outweighs the money saved.
If you need a premium theme, purchase it from the original developer.
Common WordPress Theme Installation Errors and How to Fix Them
Installing a WordPress theme is usually a straightforward process, but you may occasionally encounter errors during installation or activation. Most of these issues are easy to resolve once you understand what caused them.
Below are the most common problems and their solutions.
Error 1: The Package Could Not Be Installed. The Theme Is Missing the style.css Stylesheet
This is probably the most common error beginners encounter.
Why It Happens
WordPress expects every installable theme to contain a style.css file in the correct location. If it cannot find this file, it assumes the uploaded ZIP file is not a valid WordPress theme.
In many cases, the problem is not with the theme itself but with the file you uploaded.
For example, you may have downloaded a package that contains:
Documentation/
Licenses/
Demo Content/
Theme Files/
theme-name.zip
Uploading the entire package instead of the actual theme-name.zip file triggers this error.
How to Fix It
Extract the downloaded package on your computer and locate the installable theme ZIP file provided by the developer.
Upload only that ZIP file through:
Appearance → Themes → Add New → Upload Theme
Error 2: Destination Folder Already Exists
You may see a message similar to:
Destination folder already exists.
Why It Happens
The theme is already installed on your website.
This usually happens when you accidentally upload the same theme twice.
How to Fix It
Go to:
Appearance → Themes
If the theme is already installed, simply activate it.
If you intended to install a newer version, update the existing theme instead of installing it as a new theme.
Error 3: Theme Upload Failed
Sometimes WordPress refuses to upload the ZIP file.
Possible Causes
- Upload size exceeds the hosting limit
- Corrupted ZIP file
- Interrupted upload
- Server timeout
Solutions
Try the following:
- Download the ZIP file again.
- Confirm that the file is complete.
- Check your hosting upload limits.
- Upload the theme using FTP if the dashboard uploader continues to fail.
If your hosting plan has a very low upload limit, contact your hosting provider to increase it.
Error 4: White Screen After Activating the Theme
If your website displays a blank white screen immediately after activating a theme, do not panic.
This issue is commonly known as the White Screen of Death (WSOD).
Possible Causes
- PHP fatal error
- Theme incompatibility
- Plugin conflict
- Insufficient server memory
How to Fix It
Start by disabling the newly activated theme.
If you cannot access the WordPress dashboard, use your hosting File Manager or FTP to temporarily rename the active theme folder inside:
wp-content/themes/WordPress will automatically fall back to another installed theme if one is available.
After regaining access, check the theme documentation and verify that your hosting environment meets its requirements.
Error 5: Theme Looks Nothing Like the Demo
This is not actually an error.
Many users expect their website to look exactly like the theme’s demo immediately after activation.
However, demo websites usually include:
- Sample pages
- Custom menus
- Images
- Widgets
- Theme settings
- Demo content
- Premium plugins
A newly installed WordPress website contains none of these elements.
Solution
Read the theme documentation to determine whether it provides:
- Starter templates
- Demo import tools
- Sample content
- Recommended plugins
Many modern themes include one-click demo import features that recreate the appearance shown in the demo.
Error 6: Broken Layout After Changing Themes
Your content is still present, but the layout appears incorrect.
Possible Reasons
- Old page builder styles
- Different content widths
- Missing widgets
- Different menu locations
- Cached CSS
Solution
Review:
- Menus
- Widgets
- Homepage
- Customizer settings
- Site Editor
- Page Builder templates
Then clear any caching plugins or CDN caches before testing the site again.
How to Choose the Right WordPress Theme
With thousands of themes available, choosing one can feel overwhelming.
Rather than selecting a theme based solely on appearance, evaluate it using practical criteria.
Performance
A lightweight theme generally loads faster and provides a better user experience.
Avoid themes that include unnecessary features you do not plan to use.
Mobile Responsiveness
More than half of web traffic comes from mobile devices.
Always preview a theme on:
- Desktop
- Tablet
- Mobile
A responsive design is no longer optional.
Regular Updates
Choose themes that receive regular maintenance.
Frequent updates usually indicate that the developer actively supports the product and keeps it compatible with the latest WordPress releases.
Reviews and Ratings
If you’re installing a free theme from the WordPress Theme Directory, review:
- Ratings
- Number of active installations
- User feedback
These can provide useful insights into the theme’s quality and reliability.
Compatibility
Check whether the theme supports the tools you plan to use.
For example:
- WooCommerce
- Gutenberg
- Elementor
- WPML
- Popular SEO plugins
Compatibility reduces the likelihood of future problems.
Recommended Free WordPress Themes
If you’re just starting, these themes are excellent choices.
| Theme | Best For |
|---|---|
| Astra | Blogs, Business, Multipurpose |
| Kadence | Speed and Performance |
| GeneratePress | Lightweight Websites |
| Blocksy | Modern Blogs |
| Neve | Small Business |
| OceanWP | WooCommerce Stores |
| Hello Elementor | Elementor Websites |
| Twenty Twenty-Six | Full Site Editing |
Each of these themes is actively maintained and beginner-friendly.
Recommended Premium WordPress Themes
Premium themes provide additional templates, advanced customization options, and dedicated support.
Popular choices include:
| Theme | Best For |
|---|---|
| Astra Pro | Multipurpose Websites |
| Kadence Pro | Business Websites |
| GeneratePress Premium | Performance-focused Sites |
| Divi | Visual Page Building |
| Avada | Multipurpose Websites |
| Flatsome | WooCommerce |
| WoodMart | Online Stores |
| Blocksy Pro | Modern Business Sites |
Choose a premium theme only if its additional features genuinely benefit your project.
Frequently Asked Questions (FAQs)
| Can I Install Multiple WordPress Themes? |
|---|
| Yes.
You can install multiple themes on the same website, but only one theme can be active at a time. |
| Will I Lose My Content If I Change Themes? |
|
No.
Your posts, pages, media files, comments, and users remain in the database. However, some design-related settings may need to be reconfigured. |
| Can I Switch Back to My Previous Theme? |
|
Yes.
If the old theme is still installed, simply activate it again from: Appearance → Themes |
| How Many Themes Should I Keep Installed? |
Keep:
|
| Are Free Themes Safe? |
|
Themes downloaded from the official WordPress Theme Directory are reviewed before publication and are generally safe to use.
Avoid downloading themes from unofficial websites. |
| Can I Install a Theme Without FTP? |
|
Yes.
Most users install themes directly through the WordPress dashboard. FTP is only needed in specific situations. |
| Why Doesn’t My Website Look Like the Theme Demo? |
Demo websites include:
|
| Can I Edit My Theme? |
|
Yes.
However, avoid editing the parent theme directly. Use:
|
| What Is the Difference Between Installing and Activating a Theme? |
|
Installing copies the theme files to your website.
Activating makes that theme your website’s current design. You can install multiple themes but activate only one at a time. |
| Should I Update My Theme? |
Yes.
Theme updates often include:
|
| Can I Use Premium Themes on Multiple Websites? |
|
It depends on the developer’s license.
Some licenses allow unlimited websites, while others limit the number of installations. Always review the licensing terms before purchasing. |
| Is a Child Theme Necessary? |
|
If you’re only changing colors, typography, or settings through the Customizer or Site Editor, a child theme may not be necessary.
However, if you plan to edit PHP templates or CSS files directly, using a child theme is strongly recommended. |
Final Thoughts
Installing a WordPress theme is one of the quickest ways to transform the appearance of your website. Whether you choose a free theme from the WordPress Theme Directory, upload a premium theme using a ZIP file, or install one manually through FTP, the overall process is straightforward once you understand the available methods.
As your website grows, remember that a theme should do one job exceptionally well: control your site’s design. Avoid choosing a theme simply because it includes dozens of extra features you may never use. A lightweight, well-maintained, and regularly updated theme will generally provide a better experience for both you and your visitors.
If you’re launching a new website, start with a trusted theme, learn its customization options, and focus on creating valuable content before worrying about advanced design tweaks.
Now that your website has a professional design, the next step is extending its functionality.
In the next tutorial, you’ll learn how to install a WordPress plugin, including installing plugins from the WordPress Plugin Directory, uploading premium plugins, managing updates, and troubleshooting common installation issues.